Today I am going to show you how easy it is to start a blog with WordPress – the wildly successful free blogging software. It is actually much easier than you think, and will only take 15-20 minutes of your time.
Have you been wanting to start a blog, but were intimidated by the technical aspects of starting a website?
Don’t worry! I will take you through the three simple steps that my team and I have used to launch a small network of successful blogs.
Take a quick look at this…
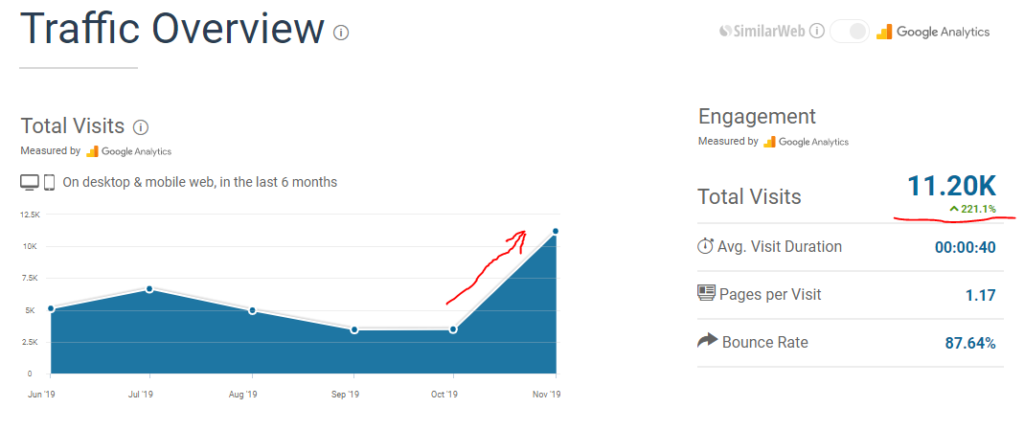
This is a screenshot of one of our WordPress blogs that has recently taken off in popularity. We write very useful articles for the scuba diving community, and nearly all of the traffic to the website comes from Google.
This kind of success could be right around the corner for you, too! All it takes is a little know-how and a leap of faith.
The Three Steps to Starting a Blog With WordPress
These are all very straight-forward and something that anyone who uses the internet regularly can do.
- Choose Your Domain Name
- Create Your Web Hosting Account
- Install the WordPress Software (I will show you how to have it done “auto-magically”)
The Most Common Concerns
We have worked with hundreds of people who want to start a blog with WordPress for the very first time. Like you they typically have one or two things holding them back. They typically look something like this:
- “How do I know that I am picking the right hosting site? They all seem the same to me.”
- “I have absolutely no web design experience. None. I am completely pre-novice in this regard.”
- “Cost is something of an issue. I don’t need the cheapest option on the market, but I can’t splurge, either.”
In addition to the technical aspects of creating a WordPress blog, we will address each one of these concerns as we go.
Let’s Get This Party Started
After you finish the steps in this tutorial, you will have your very own WordPress blog online and you will be ready to take over the blogosphere. If you can setup and manage a GMail or Yahoo! Mail account, then you will be able to beast your way through this.
The best news is that my favorite Web Hosting Provider is going to do all the heavy lifting for you!
Choose Your Domain Name
Picking a domain name can be agonizing. There is a lot of pressure to come up with the right name, and it can be harder and harder nowadays to find something that is even available.
Don’t spend a lot of time on this step, because it is MUCH more important to get a blog up and start creating content, then having the “perfect” domain name.
In a lot of ways it is more art than science. Domain names usually have to pass your “gut-check.”
There are three types of domain names for blogs that have proven to be successful over time.
Personal Name
Some bloggers have used their personal name to create a personal brand. This works especially well if you are going to start a lifestyle blog, or a topic that works best if your personal story or expertise creates a great celebrity effect.
Examples
PerezHilton.com, DrudgeReport.com, CupOfJo.com, CamilleStyles.com, NeilPatel.com
Brand Name
Some bloggers have decided to create a brand around their company or organization identity. This works well for collaborative efforts and people that want to make a name for themselves as a group.
Examples
TechCrunch.com, Gizmodo.com, Mashable.com, Lifehacker.com, Wired.com
Keyword-Rich Domain Name
Over the years, many bloggers have been able to create authoritative blogs around their chosen topic using their main focus search term, or a variation, as their brand name. This not only helps with getting ranked in Google for your topic, but also gives a cohesion to your blog.
Examples
BackyardChickens.com, ScubaDiving.com, ExpertPhotography.com, Recipe.com, HealthyFood.com
Final Selection
I always try to pick a domain name with a .COM suffix if possible. If none are available, then I will try for a .CO or .NET domain name. I try to leave .ORG alone because this domain suffix is really reserved for non-profit organizations, and I like to respect that.
I like to find domain names that Google will like for its search algorithm, while also easy enough that can be passed around with word-of-mouth or social media without being confusing.
I have what I call the “Coffee Shop Test” for domain names:
“Can you see two people who would be interested in your blog easily sharing the domain name across the table?”
If you can see those people easily sharing the domain name in a conversation or with their phone, then you passed the test.
Create Your Web Hosting Account
What Exactly is Web Hosting?
We are now getting to the part of creating a new blog that is usually the most intimidating. Actually getting the thing online. On the surface, web hosting sounds confusing and technical. While there are very technical and confusing aspects to it, the good news is that you are paying someone to take care of it for you!
To run a blog, all you really need is a computer that has access to the internet. You could install WordPress on your laptop and make it available to the internet if you really wanted to. If you did that though, your laptop would have to always be powered on, it would need a really fast CPU, and you would have to give access to your laptop to the public.
While it would “technically” work, you don’t want to dedicate your personal devices to running your blog. So we are going to rent someone else’s really fast computers (servers) instead! Let them take care of all that stuff.
My Favorite Web Hosting Provider
When you are shopping for a Web Hosting Provider, there are 3 things that you want from their service:
- Fast, reliable servers – we want a blog that loads fast for our readers!
- Friendly, helpful support – we want people that will help when their stuff if it breaks!
- Great, affordable price – we want all the things for cheap!
I have used about a dozen or so Web Hosting Providers since 2012. Most of them had two out of the three items above down pretty well, but I have only found one that really had all three down for me. That web hosting provider is Bluehost.
They have a Web Hosting Package made specifically for blogging using WordPress. It is very fast and easy to manage. Everything is setup for you as soon as you completed the sign-up form. After that, you just login and start blogging!
Creating Your Blog With Bluehost
In this example, I will show you the setup process for Bluehost. It is very affordable and will give you everything you need to run your blog for 3 whole years!! With the special deal that Bluehost is offering, it will cost you less than 15 cents a day!
This web hosting plan is perfect for a beginner, especially if you are on a tight budget.
To receive the best deal right now – click here for this special deal of only $3.95 per month!
Choosing the Right Hosting Plan
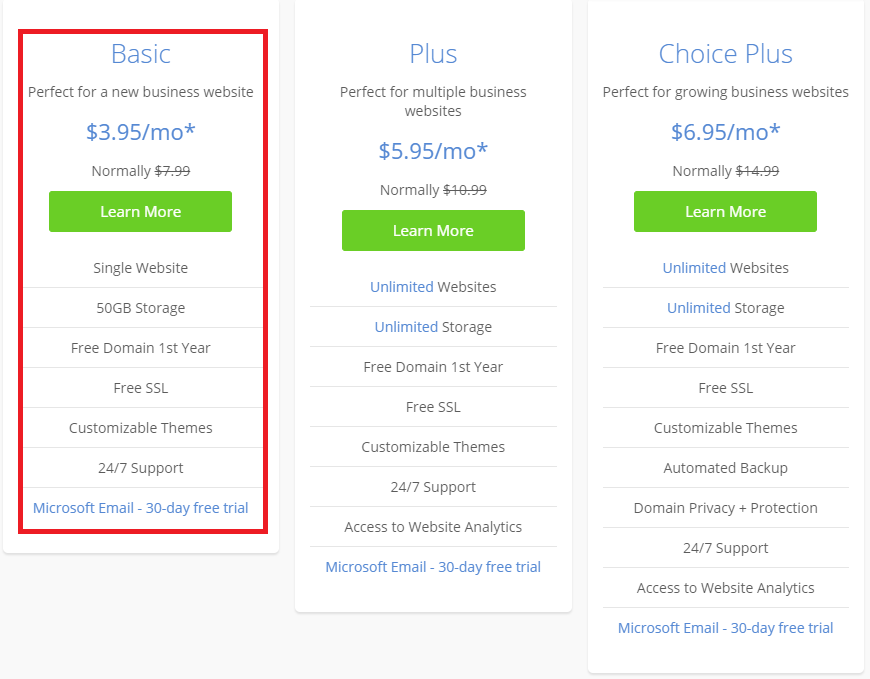
I recommend going with the $3.95 plan. This is one of the most affordable plans on the internet. They have great performance and uptime. We know, because we have thoroughly compared them against nine of their competitors.
(You can read our in-depth review here.)
If you already have a website up and aren’t happy with your current provider, then I recommend you switch to Bluehost. They will help you with the site migration, and their customer service and admin dashboards are MUCH better!
The higher plans come with features you don’t need right now, so that is why I just stick with the Basic Plan:
Complete the Sign Up Form
Your first step is to enter your domain name. If you don’t already own the domain name, then enter it into the box on the left. If you already registered your domain somewhere else, then enter it into the box on the right.
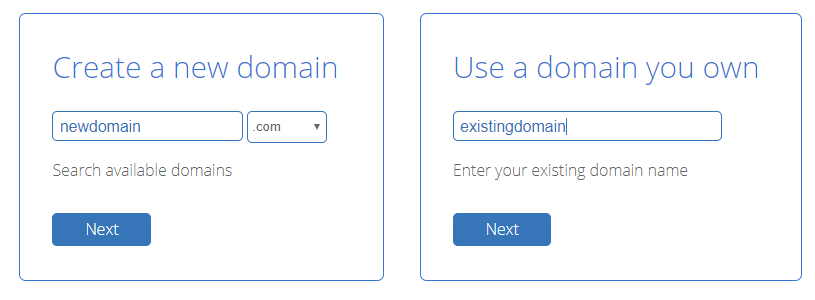
See if your domain is FREE!
Once you have taken care of your domain name, just enter your contact and payment details.
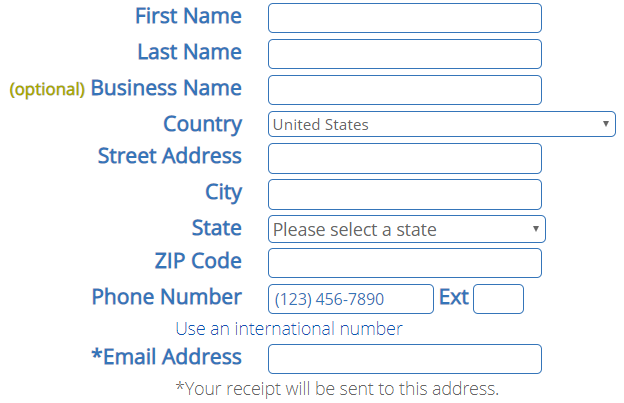
Then pick your package and only keep the Domain Privacy under Extras for now. Believe me, it will save you from TONS of SPAM in your email if you select this.
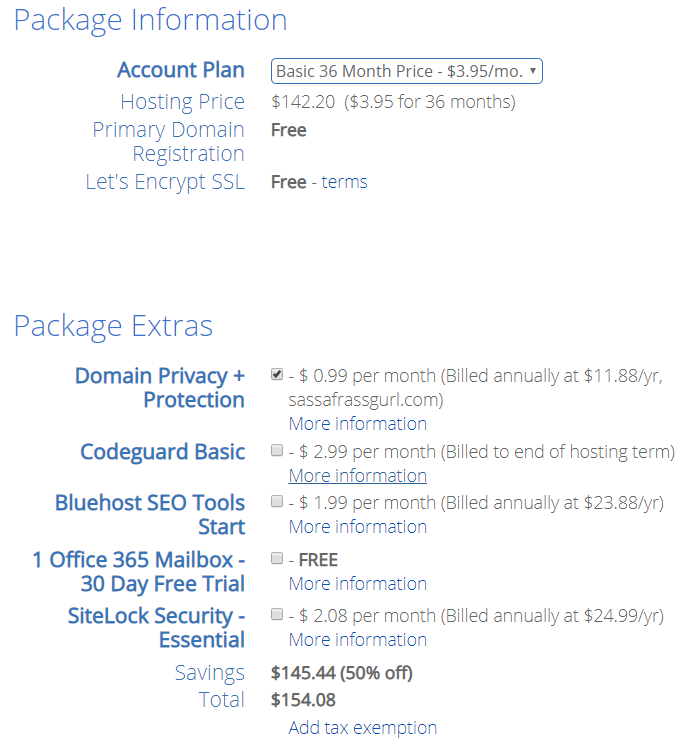
Then simply enter your payment information, and that’s it! Their automation will create your web hosting account on their servers for you, and send you the login information to your email.
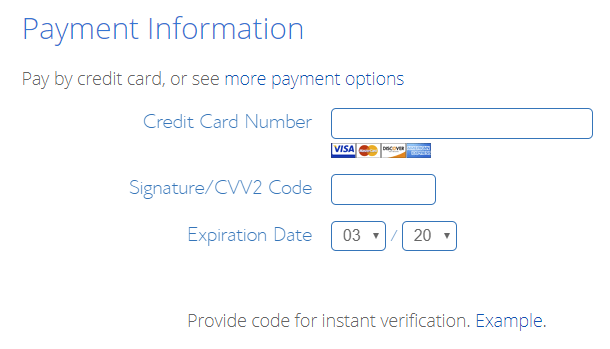
Pretty easy, right? Just follow these steps, and you will be online and on your way to creating an awesome blog!
Install the WordPress Software
This step is the easiest part. Back in the day, installing WordPress used to take hours and was very confusing if you hadn’t worked with web servers before.
Now it is done for you “automagically” with just a few clicks. Bluehost has amazing automation behind the scenes that will take care of everything for you. (It’s the closest thing to a robot butler that I have ever had.)
The Initial Installer
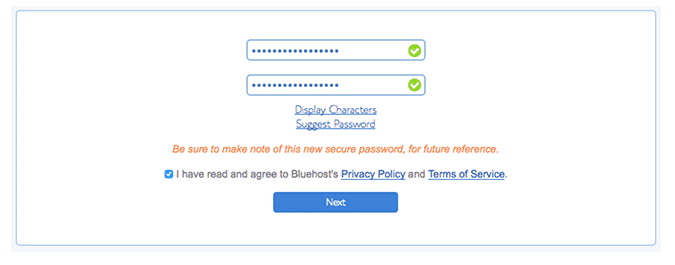
First thing you will be prompted for is a password. Make it a secure one.
Then select the Theme you want to use for your website. Themes are what control how your blog looks, and can be swapped out anytime you want, so don’t feel like you are getting locked into something permanent.
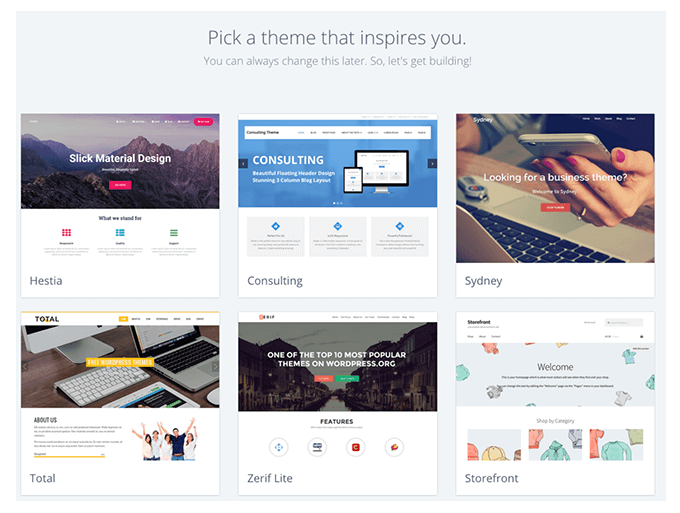
That’s it really! You won’t have to do anything else to get the software installed on your new web hosting account. Follow the next few steps to make the site live online.
The WordPress Admin Dashboard
Once the WordPress software is installed, you will be redirected to the WordPress Admin Dashboard. This can’t be seen by the public, it is only available with the password you set.
You use the WordPress Admin Dashboard to create new blog posts, change or modify your Theme, etc. You will use it a lot during your life as a blogger.
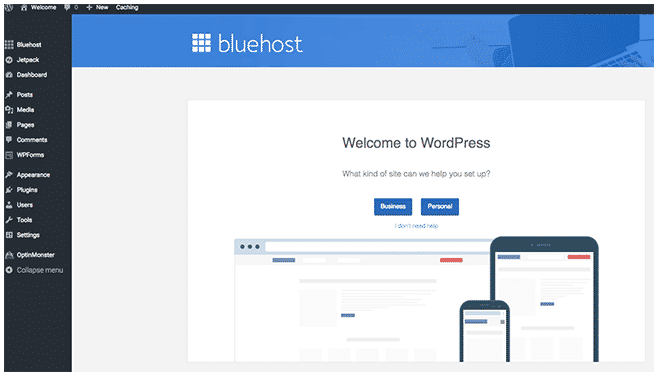
Launch Your New Blog
Here is the really exciting part…congrats for making it this far. You are awesome!
Follow the instructions in the picture below and click the links on the WordPress Admin Dashboard in this order:
Bluehost > Home > Launch

Then simply give your new blog a Title and Description, and click the blue Next Step button:
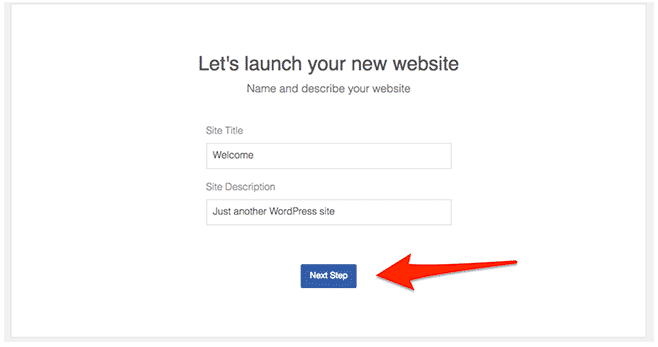
You made it! You have completed all the necessary steps to start a blog with WordPress. (I told you it was super-easy!)
Once all the launch steps are done, you will be redirected to the management dashboard for your Bluehost account.
Here is what it looks like:
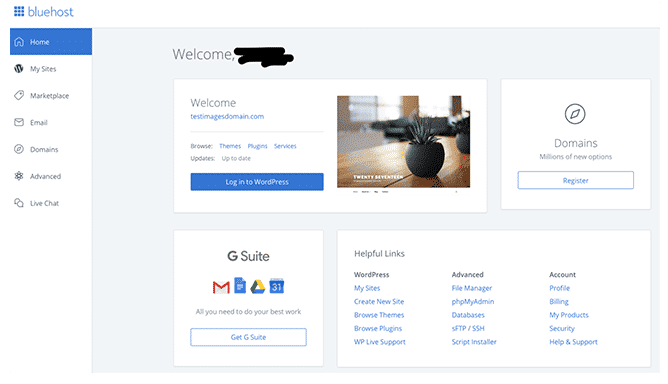
You can use this dashboard to Livechat with Bluehost support, setup email accounts, access the WordPress Admin Dashboard, and more. It is your home base.
I always recommend Bluehost to new bloggers because of how easy they make it to get started. Other web hosting providers make you install WordPress on your own. It can be hard to understand and very time-consuming.
Final Thoughts
There really isn’t too much more to say. That is the entire process on how to start a blog on WordPress. There isn’t more to it than that. Anyone can follow these steps and have their brand-new blog online in 15-20 minutes.
If you want to see what to do next, then I highly suggest you join our FREE email course that goes into more detail on how to finish building out your WordPress blog, how to monetize your traffic, and promote your content so you can start to build your audience.
You will receive a FREE email once a day for seven days.
Here is the outline:
Day 1: Inspiration
Day 2: Preparation
Day 3: Creation
Day 4: Beautification
Day 5: Construction
Day 6: Monetization
Day 7: Promotion
These are the exact steps we use ourselves to grow our popular network of WordPress blogs.

